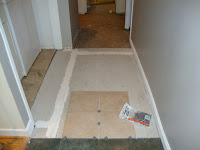
What did you do on the 4th? Well, we decided to take the long weekend and turn it into "PROJECT WEEKEND!!!" We went out to Home Depot looking for paint, we decided to start with white ceiling paint. We bought a 5 gallon bucket of white Behr paint...boy was that a bad idea. Turns out, that Behr paint (at least in our case) is not the greatest. So we then took that back and moseyed on over to Sherwin Williams where we met the nicest girl that sold us all of our paint. We arrived back at home to take on monster project of repainting a portion of the house. We needed to get it done by the 9th so the carpet installers could come.
Your first time painting supplies do add up in cost, but after you buy once, you won't have to spend too much the next time you need to paint. We found that Sherwin Williams SuperPaint to be the best bang for you buck for lighter colors (SuperPaint) They also make a really awesome white ceiling paint that we highly recommend called Brilliance. All our paints were a primer and paint in one, and their paint only required one coat as opposed to our experience with Behr.
Tips while painting, use liners in pans (they are cheap and great for not ruining your pans), plastic wrap to put over the pans and brushes/rollers while you are not painting helps save the paint if you still have more to paint later. Buy lots of plastic drop cloths to cover your floor as well as blue painters tape. Remember to remove the tape as soon as you are done painting...if you don't, as you can see in some of ours, it will rip it off the paint. Luckily we are installing crown molding.


Before installing you need to install cement backer board on the floor to protect the sub-flooring from warping. You need to buy special Cement Board Screws to do this, usually right next to it at the store. You also need a trowel, rubber groat float, tile spacers, mortar, grout and some buckets.
Also we bought our own tile saw to save us some money, renting one, would have cost too much. It wasn't too hard to use, just remember to keep the water reservoir filled as you don't want to start a fire cutting tile.
When we bought our mortar, we accidentally bought fast setting mortar...bad idea for first time tile project. Thankfully, it wasn't a big project, so we were able to get the tile laid before it hardened.
We had to wait overnight before we could grout the tile, this went a lot smoother than the mortar. Use the rubber groat float to push the groat into the spaces. Remember to remove as much from the tile surface as possible while doing this, makes cleaning it much easier. After the 20 minutes or so, we wiped away the excess groat with a wet sponge, having to rinse several times to keep the sponge clean. We also used a steam mop to remove the excess haze that the groat sometimes leaves. You can use a special haze remover too.
After a week and the carpet installation, we then applied a silicone groat sealer.


No comments:
Post a Comment